Extending the Control Panel
Recently I had a situation where I needed to run a lengthy process inside my Sitecore solution which needed to run some custom code. The actual process itself was to update a separate Lucene index we were using for a user search component on an intranet. I prefer to perform user search against an index rather than the user store itself. Primarily for performance and secondly to provide more options for the search.
The normal way I've seen a lot of this kind of thing done is someone will create a very plain looking web form (aspx) and drop it in a folder, then have the admin user hit that page directly. The problem with this approach is that the page is normally quite ugly and doesn't feel like part of the solution. And if your process takes a while you would have to custom code the ajax calls to update your UI and provide feedback to the user.
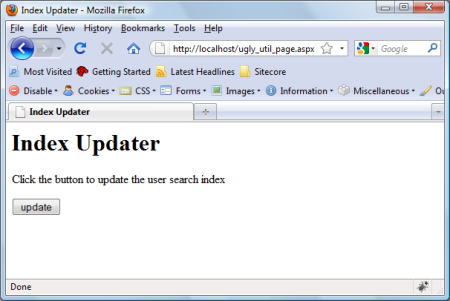
Can you tell this page was designed by a developer? :)
Realistically it's a sin to burdon your users with this ugly kind of page. Especially when Sitecore is so extensible and already contains a location for these occasional utilities; the control panel.
It's very easy to add your own entries into the control panel. All the categories and utilities themselves are defined under /sitecore/content/Applications/Control Panel in the core database. To add your own utility it's as simple as adding an item under an existing category (based on the /sitecore/templates/Sitecore Client/Tasks/Task page template) based on the /sitecore/templates/Sitecore Client/Tasks/Task option template. The Header field is just the text displayed on the UI and the Click field is the Sitecore command to execute when the utility link is clicked.
The command is normally in the form of category:command_name such as myproject:updateuserindex. This command needs to be defined either in the App_Config/Commands.config file or in a configuration include file. The command definition contains both the full command name and a .net type to instantiate when the command is executed. The .net type needs to inherit from Sitecore.Shell.Framework.Commands.Command and override the Execute method.
If we have a short process to perform then we could perform that process from this method, then use something like the ClientResponse.Alert method to pop up a javascript alert dialog to let the user know the outcome of the process (success, failure, etc). If it's a lengthy process you could also kick off a job here and then start a client pipeline which could make periodic requests to the server to get the status of the job and display. For my example here I'm going to launch a sheer wizard to kick off the process. Sheer UI also provides a facility to periodically update the user on the progress of the job. Another reason I chose a wizard here is because it's what the user would expect. None of the other utilities in the control panel execute the desired process directly, they launch up either a dialog or a wizard. A wizard is also a great idea if you need to collect information from the user to execute the process.
To have my wizard open and display in a modal dialog, launch the dialog with the following from within the Execute method of the command.
Context.ClientPage.ClientResponse.Broadcast(
  Context.ClientPage.ClientResponse.ShowModalDialog(
  "/sitecore/shell/default.aspx?xmlcontrol=RebuildUserSearchIndex"), "Shell");
The xmlcontrol parameter in the url needs to refer to a sheer control. Inside our sheer layout file (XAML like file with XML extension) the control name is given as the child of the root "control" element.
<control xmlns:def="Definition"
  xmlns="http://schemas.sitecore.net/Visual-Studio-Intellisense">
  <RebuildUserSearchIndex>
  </RebuildUserSearchIndex>
</control>
Note that because we're not going to use this control in a presentation definition inside Sitecore, then we don't need to register the control using the developer centre. We can just write it and as long as the XML file is in the correct location Sitecore will pick it up.
It's a little funny how the sheer engine works, but it's this element name that matters. Sheer doesn't locate controls by filename, so it doesn't actually matter what I call the file in which this control is defined, or even where I put it. As long as the location in which it exists is included in the controlSources element in web.config. It's pretty safe to put your file below the /sitecore/shell/controls folder as this folder is required by Sitecore itself and is already included.
Sheer UI has built in support for wizards, so immediately inside my control name tag I can define a control of type WizardForm.
<WizardForm
  CodeBeside="MyProject.RebuildUserSearchIndex,MyProject">
</WizardForm>
Note the CodeBeside attribute in which I define the type which handles the forms behavior. Now I can fill in the pages of the wizard. A wizard form consists of a number of pages including a first page and a last page. The first page normally describes to the user what the wizard does and the last page provides a summary of the process that was executed. The first and last pages are given inside the WizardForm element with WizardFormFirstPage and WizardFormLastPage elements respectively. All the other pages will be given by WizardFormPage elements.
In my simple example above I will have 3 pages. The first page describing that the index will be rebuilt, a progress page to show the user the process is indeed executing, and the final page providing a summary of the operation. I'll define my pages (and complete the rest of my XAML file) with the following which is inserted inside the WizardForm element.
<WizardFormFirstPage ID="FirstPage" Icon="People/32x32/User1.png">
  <Border Class="scWizardWelcomeTitle">
    <Literal ID="Welcome" Text="Welcome to the User Search Index Wizard."/>
  </Border>
  <Literal Text="This wizard helps you:"/>
  <ul>
    <li class="scWizardBullet">
      <Literal Text="Rebuild the user search index."/>
    </li>
  </ul>
  <Literal Text="To begin, click the 'rebuild' button below"/>
</WizardFormFirstPage>

<WizardFormPage ID="Rebuild" Header="Rebuilding"
  Text="This may take a few minutes." Icon="People/32x32/User1.png">
  <Edit Mode="Hidden" ID="JobHandle" Width="0" Height="0"/>
  <GridPanel Width="100%">
    <Space Height="64"/>

    <ThemedImage Src="People/48x48/User1.png" Width="48" Height="48"
      GridPanel.Align="center"/>

    <Space Height="16"/>

    <Border Align="center">
      <ThemedImage Src="Images/progress.gif" Width="94" Height="17"/>
    </Border>

    <Space Height="16"/>

    <Border Align="center" GridPanel.Align="center" GridPanel.Style="font-weight:bold">
      <Literal Text="Rebuilding..."/>
    </Border>

    <Space Height="16"/>

    <Border Align="center">
      <Literal ID="StatusMessage"/>
    </Border>

  </GridPanel>
</WizardFormPage>

<WizardFormLastPage ID="LastPage" Icon="People/32x32/User1.png">
  <Border ID="SuccessMessage">
    <Literal Text="The index has been rebuilt successfully."/>
  </Border>
  <Border ID="ErrorMessage">
    <Literal Text="The index rebuild failed." />
  </Border>

  <Border>
    <Literal ID="Status"/>
  </Border>
</WizardFormLastPage>
The WizardForm control provides the buttons and handling of switching pages of the wizard. You can also override the ActivePageChanged and ActivePageChanging methods to customise this behavior. By default the pages of the wizard are presented in the order in which they are defined in the XAML file. But using these method overrides you can conditionally skip certain pages. You can also cancel the transition in the ActivePageChanging method so you have opportunity to perform validation on user input.
If you've read the XAML above you'll see that instead of having a "next" button on the welcome screen, I want to have it labelled "rebuild". I also want to disable the navigate buttons when the index is being rebuilt. The following ActivePageChanged method will achieve this.
protected override void ActivePageChanged(string page, string oldPage)
{
  base.ActivePageChanged(page, oldPage);

  NextButton.Header = "Next >";

  if (page == "FirstPage")
    NextButton.Header = "Rebuild";

  if (page == "Rebuild")
  {
    BackButton.Disabled = true;
    NextButton.Disabled = true;
    StartRebuild();
  }
}
Note I also kick off the rebuild process when we change to the "Rebuild" page. I'll run the rebuild in a job which is a background thread. This way the job can run asynchronously and my request can return.
private void StartRebuild()
{
  // Start job for index rebuild
  var options = new JobOptions("Rebuild User Search Index",
    "IndexRebuild", Context.Site.Name, this, "RebuildIndex");
  var job = JobManager.Start(options);
  JobHandle.Value = job.Handle.ToString();

  // Start client pipeline to check progress
  Context.ClientPage.ClientResponse.Timer("CheckStatus", 500);
}
When creating a JobOptions object you can specify an object to run your process as well as the method to invoke on that object (last 2 parameters in the above call). So the rebuild will be run using this form and calling the "IndexRebuild" method on it. The Timer method call down the bottom causes the client to wait the specified time (second parameter, milliseconds) then call the method given in the first parameter. So I'll need to define the IndexRebuild and CheckStatus methods.
One of the nice things about Sitecore jobs is that they provide a way to update status across threads through the job's Status.Processed property. There are a few ways to find an existing job when the call for CheckStatus comes in but I like to use the job handle of the job returned by the JobManager. I'll need to store the handle so I also have access to it on the call to CheckStatus. For this I'll use a hidden field and store the handle value in that.
To get access to the controls of the form we have to get a little "2003 old school" and define the variables in our code file. The controls come out of the Sitecore.Web.UI.HtmlControls namespace, so include a reference to that namespace at the top of your file, then inside your class define the controls as protected so they can be populated on the postback.
protected Edit JobHandle;
protected Literal StatusMessage;
protected Border SuccessMessage;
protected Border ErrorMessage;
protected Literal Status;
I won't actually build the index in this example, as I'm only concerned with describing how to create such an application. Instead I'll simulate the lengthy operation so we can witness the UI updating while the background thread runs.
private void RebuildIndex()
{
  // Simulate a lengthy operation so the client pipeline can execute
  Context.Job.Status.Processed = 0;
  for (int i = 0; i < 20; i++)
  {
    Thread.Sleep(500);
    Context.Job.Status.Processed++;
  }
}
So I update the processed count in the method above and I'll read that status from the client pipeline server method.
protected void CheckStatus()
{
  var handle = Handle.Parse(JobHandle.Value);
  if (handle != null)
  {
    var job = JobManager.GetJob(handle);
    if (job != null)
    {
      StatusMessage.Text = "Processed: " + job.Status.Processed.ToString();
    }

    if (job.IsDone)
    {
      Active = "LastPage";
      ErrorMessage.Visible = false;
      Status.Text = StatusMessage.Text;
    }
    else
      Context.ClientPage.ClientResponse.Timer("CheckStatus", 500);
  }
}
This callback is also where we check on the status of the job and when complete move to the next page of the wizard by setting the "Active" property to the ID of the page you want to swap to. If the job isn't finished we'll tell the client to check the status in another 500 milliseconds.
And after you fill in the proper index creation method, you're done! I know that may have been a little more work than the ugly util page that was whacked together above, but this wizard shows a lot of polish and enhances the user's experience when using your solution. Not to mention the built in mechanisms for starting a background thread and having the client periodically check on the status of the running job. Once you get the hang of sheer you'll be knocking out these wizards for those utils quicker than you can make that UX expert shake his head in dismay.
If you need some help with sheer, keep in mind that the XAML files are not compiled; meaning you can open up the XAML files for any of the Sitecore UI components. Especially when working with dialogs and wizards, the existing Sitecore controls are invaluable as a reference.
And here's the final result in all it's sheer glory!
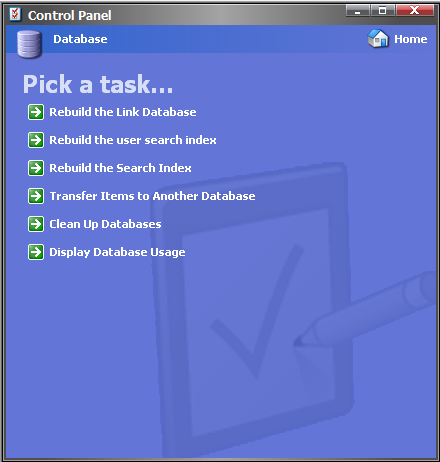
Control panel showing my user search index rebuild option.
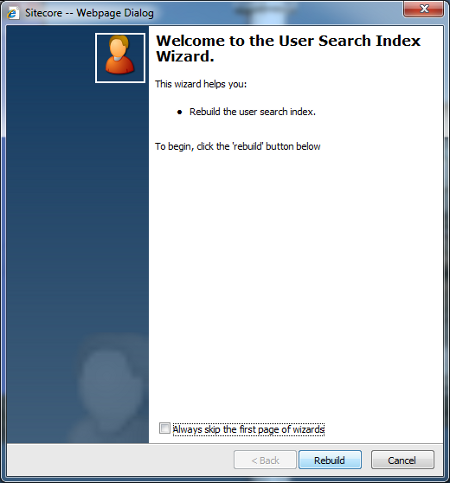
Welcome page of the wizard
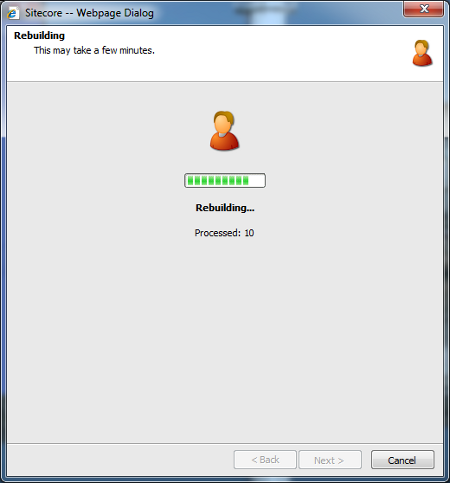
Processing page of the wizard
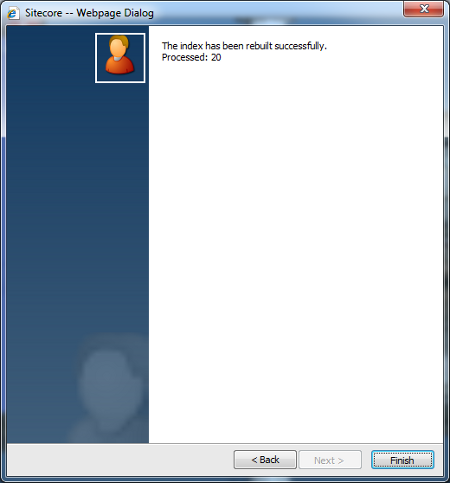
Summary page of the wizard
Leave a comment